Building Your First AWS VPC: A Hands-On Guide
Step-by-step walkthrough of creating a production-style VPC with public and private subnets, NAT gateway, and proper routing.
VPC networking confused me until I actually built one. Reading about route tables is abstract. Creating them and watching traffic flow makes it click.
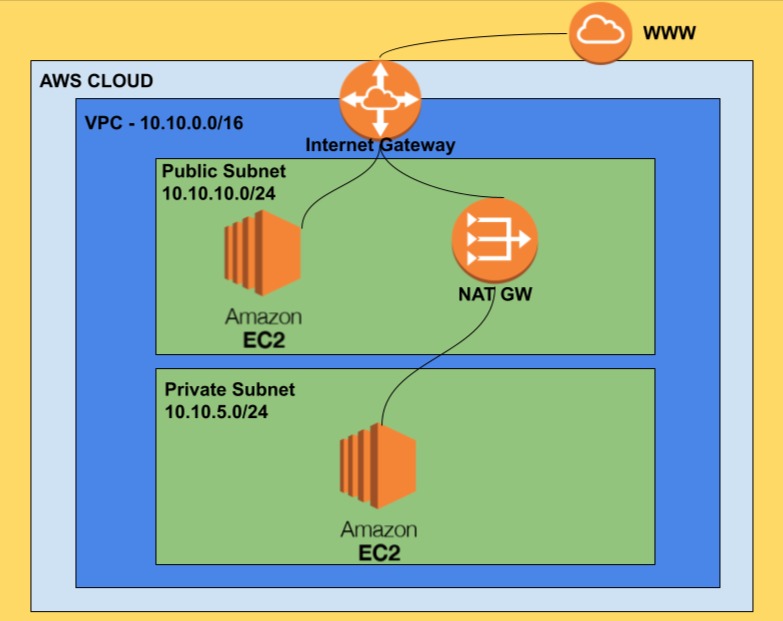
Here's the VPC architecture we'll build:
Create the VPC
VPC Console → Your VPCs → Create VPC
- Select "VPC only"
- Name:
my-vpc - IPv4 CIDR:
10.10.0.0/16
The /16 gives you 65,536 addresses. Way more than you need for learning, but mirrors real production sizing.
Create Subnets
We need two subnets: one public, one private.
VPC Console → Subnets → Create subnet
Public subnet:
- VPC:
my-vpc - Name:
public-subnet - CIDR:
10.10.10.0/24 - AZ: Pick any
Private subnet:
- VPC:
my-vpc - Name:
private-subnet - CIDR:
10.10.5.0/24 - AZ: Same as public
At this point, both subnets are identical. What makes one "public" and one "private" is the routing we'll configure next.
Create Internet Gateway
The Internet Gateway (IGW) connects your VPC to the internet.
VPC Console → Internet Gateways → Create internet gateway
Name it and create. Then attach it to your VPC. This step is easy to forget.
Create NAT Gateway
NAT Gateway lets private subnet instances reach the internet without being directly accessible from it. They can pull updates and call APIs, but nothing can connect inbound.
VPC Console → NAT Gateways → Create NAT gateway
Important: Put the NAT Gateway in the public subnet. It needs internet access via the IGW to forward traffic.
Allocate an Elastic IP when prompted.
Wait for status to show "Available" before continuing.
Configure Route Tables
This is where public and private actually get defined.
Public Route Table
Create a route table for your VPC. Edit routes and add:
| Destination | Target |
|---|---|
| 0.0.0.0/0 | Internet Gateway |
This sends all non-local traffic to the IGW - making it a public route table.
Associate this route table with your public subnet.
Private Route Table
Create another route table. Edit routes and add:
| Destination | Target |
|---|---|
| 0.0.0.0/0 | NAT Gateway |
This sends outbound traffic through NAT - the subnet can reach the internet but can't be reached from it.
Associate this route table with your private subnet.
Enable Auto-Assign Public IP
For the public subnet, enable auto-assign public IPv4. Otherwise instances won't get public IPs automatically.
Subnets → Select public subnet → Actions → Edit subnet settings → Enable auto-assign public IPv4
Test It
Launch two EC2 instances:
Public instance:
- Subnet: public-subnet
- Auto-assign public IP: Yes
- Security group: Allow SSH from your IP
Private instance:
- Subnet: private-subnet
- No public IP
- Security group: Allow SSH from VPC CIDR (10.10.0.0/16)
SSH to the public instance:
ssh -i key.pem ec2-user@<public-ip>
ping 8.8.8.8  # Should work
From the public instance, SSH to the private instance:
ssh -i key.pem ec2-user@<private-ip>
ping 8.8.8.8  # Should also work (via NAT)
If both pings work, your VPC is configured correctly.
Clean Up
Delete everything to avoid charges:
- Terminate EC2 instances
- Delete NAT Gateway (this costs money)
- Release Elastic IP
- Delete subnets, route tables, IGW
- Delete VPC
NAT Gateways cost about $32/month if you forget them.
Key Takeaways
- A subnet is "public" or "private" based on its route table, not its name
- Public subnets route 0.0.0.0/0 to Internet Gateway
- Private subnets route 0.0.0.0/0 to NAT Gateway
- NAT Gateway must be in a public subnet with an Elastic IP
- Always delete NAT Gateways and Elastic IPs when done - they charge hourly
- Building this once teaches more than reading about it ten times
Written by Bar Tsveker
Senior CloudOps Engineer specializing in AWS, Terraform, and infrastructure automation.
Thanks for reading! Have questions or feedback?